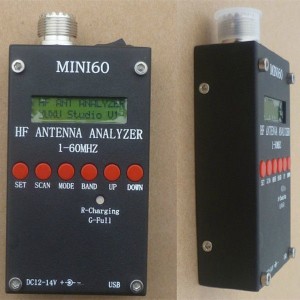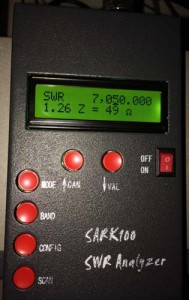
It finally arrived! My SARK100 from China

SARK100 turned on
After waiting for a pretty long time, my new gadget from China finally arrived! It’s a SARK100 antenna analyzer. I wrote about buying one, in February I think, so already some time ago!

Most radio amateurs know that antenna analyzers are pretty expensive; starting around 300 Euros (USD 310).

The only reason we buy them is because they are very useful when making antennas.

They are also useful for tuning antennas but this can also be done using the transceiver, so for years I never used an analyzer.

Some months ago I decided to spend the money and I bought a RigExpert antenna analyzer. I’m very happy with it, but when I saw the “cheap” SARK100 I decided I could use one for portable operations.

The price of the SARK100 is around 88 EURO (USD 93) so pretty cheap, compared to the average antenna analyzer.

I put a first (quick) comparison video on YouTube between my RigExpert and the SARK100. You can find it here:

The SARK100 is an older model analyzer and was sold as a kit. In China they now decided that there is money to be made, producing these analyzers and selling them. So you don’t get the latest model but it’s still pretty useful!

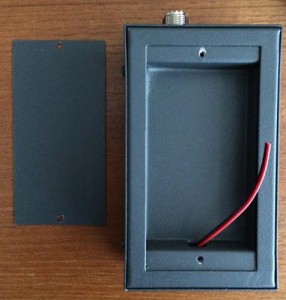
The package they sent me was very basic. It was just the SARK100, no manual, no batteries, no power cord, no invoice, no packing slip etc… !

When I opened up the battery compartment it was just empty with a power wire inside with no plug on it. Not what you would expect when you’re used to buying from the big sellers like Yaesu and ICOM! SARK100 empty battery compartment
My first impression of the SARK was that it looked pretty simple. It’s build like a tank though; feels very heavy and I have the idea that I can drive over it with my car and it would stil survive! 😉

It’s pretty small but weighs 850 grams, more or less the weight of my FT-817nd! This is good and bad; good because it will not break easily, bad because it adds a “lot” of weight to a portable setup.
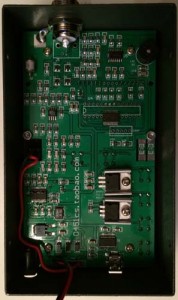
SARK100 from the inside One of the first things I did was (of course 😉 ) opening it up and checking the build quality. This was surprisingly good; no bad soldering or loose wires.

After some bad experiences with MFJ I decided to always open up any radio amateur item I buy and checking if I need to do some after production quality control! 😉

After a bit of Googling I found out what battery is needed and also found a manual in PDF form.

As a battery pack I decided to re-use my old FT-817nd battery pack. It’s exactly what is needed and seeing that I bought a replacement battery from Windcamp, the old standard FT-817nd battery could use a new purpose in life.
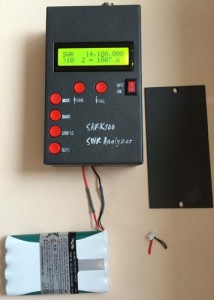
SARK100 with FT-817nd battery pack

At first startup I found that the display is small, but very readable! Perfect for outside (sunny) conditions I think. The options are pretty simple, but sufficient for simple antenna checking and building. You need to select a band, after which you can do checks on this band.

The most used option by me was checking for the resonant frequency on a selected band. I think when you’re building an antenna, this is what you want to know most; how far away am I, with my optimal SWR, from the required frequency and do I need to make the antenna longer or shorter (for wire antennas).

According to the Chinese site, these are the specifications:

  • Frequency Control: 1 – 60 Mhz
  • Source impedance: 50 Ohms
  • Stability: +/- 100 ppm
  • Spectral Purity: Harmonics down >- TBD dB beyond 60 MHz
  • Step Size: User configurable increments of 100 Hz, 1 kHz, 10 kHz, and 100 kHz
  • Usable Measurement Range:SWR: 1.0 to 9.99
  • Impedance: approx. 5 to 2000 ohms
  • RF Output: Adjustable: 2.0 Volts pp (typ)
  • Power supply: Powerd by External: 12 to 15 Volts DC, 500mA
  • Connectors: RF Out: PL
  • USB: Mini-B receptacle
  • External power: 2.1mm Power Jack (center pin positive)

And these are the things that can be measured, according to the Chinese manufacturer:

  • Measure antenna electrical parameters: SWR, impedance (resistance + reactance), capacitance, inductance
  • Measure feedpoint impedance
  • Measure ground loss
  • Adjust antenna tuners and determine loss
  • Measure inductors and capacitors
  • Measure coax transmission line (SWR, length, velocity factor, approximate Q and loss, resonant frequency, and impedance)
  • Measure and determine optimum settings for tuning stubs: SWR, approximate Q, resonant frequency, bandwidth, impedance
  • Measure balun loss
  • Measure inductor Q
  • Measure magnetic loop resonance and SWR

Reported problems with DDS chip

I read on the internet that some of these Chinese analyzers have a problem with their DDS chip. This resulted in an output frequency being 1.5 times lower than what was displayed on the analyzer. To check if this was the problem with my analyzer I did a quick test.

I made a small video of this test and Luckily my analyzer was showing the correct frequency! The articles I read about this problem were all older articles so I guess it’s an old problem that doesn’t occur anymore?!

Conclusion

All in all enough for me to find out and to play with! Of course the SARK cannot compare with my RigExpert. But you must remember that the RigExpert is around 200 euro more expensive than the SARK!

As an extra piece of kit for portable operations I think the SARK is a very nice addition to my collection!

I bought my SARK100 at the Chinese site AliExpress. This is a website that shows products of mostly Chinese sellers. These sellers sell their products through AliExpress. AliExpress has sort of an ESCROW way of working, where the seller only gets his money if you tell AliExpress that you got the product and that it was ok. If not, you can get your money back.

Of course they are also sold on eBay, and if you Google them a bit I’m sure they sell them in lots of other places as well!

Here are 3 links of sellers that sell this analyzer, but you can find a lot more that do the same. By the way I’m not connected in any way to any of these sellers so you buy at your own risk! 😉
AliExpress.com – SARK100 Seller 1
AliExpress.com – SARK100 Seller 2
AliExpress.com – SARK100 Seller 3

If you have any good or bad experiences with these analyzers, let me know. I’m very interested to know what others think of them!

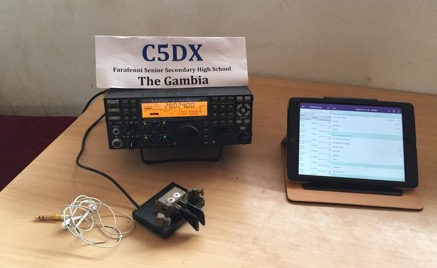
HAM QuickLog goes to Africa!

My app on the iPad in action in The Gambia

My app on the iPad in action in The Gambia

I found out that my app; Mircules HAM QuickLog was used in the C5DX DXPedition to The Gambia in Africa!

Most people that follow my blog will know that I’m the developer of Mircules HAM QuickLog which is an iPad app used for logging Radio Amateur contacts (QSO’s). I’m a software developer and I find it always nice when people are using my software!

The C5DX DXPedition was a mini DXpedition and demonstration of amateur radio to school students in The Gambia. The radio part was done by Alan (G4DJX). Alan is a headteacher of Sandringham School in St. Albans in the UK and they have a link with a school in The Gambia.

I had some contact with Alan and he was pretty positive about my logging software so I’m happy with that! He gave me some feedback about how he used the app and what would be nice additions to the app. I put a few of his remarks on my list of items to add in the app.

The Mircules HAM QuickLog app is since november previous year available in the Apple app store, so it’s pretty new. Any feedback about the app by the users is very useful for me!

More info:
www.hamquicklog.com
HAM QuickLog in the Apple app store

Operating in The Netherlands for radio amateurs from Canada

RAC logoRadio amateurs from Canada have been asking me the possibilities of operating with a Canadian HAM radio license in The Netherlands.
Because I think this information can be interesting for more Canadian operators, I decided to post it here.

Let me start by saying this; if anybody has updates or additions to my information here, please let me know so we can get it up here as accurate as possible!

We are using the HAREC / CEPT licensing system here, like everywhere in Europe. Depending on the license that you have you can operate in The Netherlands using a prefix PD or PA.

You need at least a basic with honours license to be able to operate here. If you have the basic with honours license you can operate like PD/<YOUR CALLSIGN> (so for example PD/VA3XXX)

If you have an advanced license you can operate like PA/<YOUR CALLSIGN> (so for example PA/VA3XXX)

Officially you can only operate for 3 months with the prefix PA or PD here.

From what I know you cannot change your Canadian license for a Dutch HAREC license. For this you need to do an exam.

If you want more info you can contact the Dutch government organization for radio amateurs which is called Agentschap Telecom.
Agentschap Telecom logo

You can find them here:
In Dutch: Agentschap Telecom – Radiozendamateurs
In English (less information shown): Radiocommunications Agency

I think you need a Canadian CEPT certificate from the RAC in Canada to be operating here, so be sure to get that before you come here.

Some more info:
RIC-3 — Information on the Amateur Radio Service
Temporarily Operating Canadian Amateur Stations in Other Countries
Amateur radio international operation

Disclaimer:

I think my information is accurate but don’t only depend on my info for this, get it confirmed from other sources!


It’s all about antennas!

It's all about antennas!A week or 2 ago I competed in the PACC contest. This is a radio amateur contest where operators from all over the world need to contact Dutch operators to collect points.

A contest is always a good way to check your antennas, your radio and other equipment because you are making a lot of contacts in a short period of time.

This time I again tested all I could test and was again surprised by the effectiveness of my simple antennas!

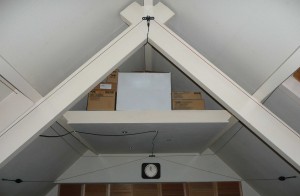
My “main” antennas are 2 home made wire antennas. I made a fan dipole for 10m and 20m and an inverted V dipole for 15m. They are both hanging inside the house in the attic.

Fan dipole and inverted V dipole

My antennas; a fan dipole and an inverted V dipole

They are the least impressive antennas I have ever seen, made with some copper speaker wire, bought in a home depot store for about 10 dollars(!)

It took me an afternoon to get them tuned and ready to use and I have had a lot of pleasure from them! I worked stations all over the world with them from Argentina to Australia and from Greenland to Siberia, mostly with only 100 watt on SSB.

I also managed to get the DXCC award with it. This is an award that you get when you worked 100 operators in 100 different countries. They need to confirm the contact to be able to count for the award. This is always the most difficult part; getting the contacts confirmed.

During the PACC contest I was several times complimented with my strong signal. I also had several situations where other Dutch stations were trying to reach a far away station and weren’t able to contact them. I managed to easily get through to these stations and work them.

This for me is the nicest part of the hobby; if and when you’re able to do a lot with limited antennas and power! Anybody can talk to the world with a 20 meter high Yagi antenna and 1 kilowatt of power. It takes more effort and skill to work the world with some speaker wire as an antenna and (relatively) low power!

For most HAM operators the importance of antennas in radio communication is clear and wire antennas have been used for ham radio sucessfully from the beginning.

You can have a lot of power but if your antenna is bad you will have trouble reaching the end of the street. But on the other hand, if you have low power and a great antenna you can work the world! 

So for me the statement is true; it’s all about antennas!

I ordered a Chinese antenna analyzer

SARK100Today I decided to buy a Chinese antenna analyzer.

I already have a RigExpert analyzer and am very happy with it, so why did I buy another one?!

Well, I must say that the price was a big reason to buy it. It’s only 77 euros (USD 88) which is very low for such a product!

Another reason is that it looks very small, so if it works ok it will be another addition to my go kit. It would be nice to have an antenna analyzer with me on my trips.

The eHam reviews weren’t that great so I have to see how useful it will be, but I feel that for 77 euros I can take a risk with it! 🙂

You can find it here by the way: SARK100

I will write another blog in the future with test results of this analyzer. The nice thing is that I can compare it with the RigExpert that I have so I can see how the Chinese analyzer works compared to a product that I’m very happy with!

Mircules DX Cluster now also for Android

Mircules DX ClusterA few years ago I made a DX Cluster app for iOS (iPhone and iPad) called Mircules DX Cluster. I’m a freelance software developer and found it interesting to make some software for mobile devices for my amateur radio hobby. A DX Cluster app seemed like a nice choice.

Making the app got me into writing mobile apps for iOS and I enjoyed the work. The app has become more and more popular in the world of amateur radio which is also a nice thing of course. 🙂

At the time I made Mircules DX Cluster for iOS I decided to not make anything for Android because I’m just a bit of an Apple fan. After getting a Samsung Tab4 Android tablet and a Sony Android phone, I warmed up to the whole Android thing! 🙂

Google Play IconI decided to make also a DX Cluster app for the Android platform and I’m happy to say that a few days ago I put the app in the Google app store! 🙂

I’m pretty happy with the result, seeing that it’s my first real app made for Android! If you like it please leave a rating and review. This will help me out a lot!


HAM Logging on the iPad with HAM QuickLog

Mircules HAM QuickLog Icon

After a lot of software development and testing I finally put my new app in the Apple app store!

The app is called Mircules HAM QuickLog (or just QuickLog) and is an app for the iPad. It’s a logging app for Radio Amateurs and has a lot of very useful features.

Now of course every producer of software will say that their software is very useful, but I’m not only a producer but also a user and customer of my own software!

I’m using QuickLog a lot so I have been able to test it and to see which features I absolutely wanted to go in there.

Dogfooding your own software is, I think, the best possible way possible of testing for bugs and usability. It got me a product that I’m very happy with as a producer and a consumer! 🙂

You can find the app here HAM QuickLog website and also in the app store:

Here is a little click through video I made of QuickLog. Watch full screen for best readability!


This article was first published on www.pa1ca.nl and is published here with permission of the author.

Mircules HAM QuickLog update for SOTA and IOTA

Mircules HAM QuickLog - SOTA and IOTA

Click on image for larger version


Previous week a new version of Mircules HAM QuickLog came out. As most people will know, QuickLog is a logging app for Radio Amateurs voor the iPad. I wrote about this earlier in another post.

The 2 most important additions to the app are “import from URL” and SOTA / IOTA support!

Import from URL makes it possible to import an ADIF file from any location on the internet. This is especially useful for people that don’t want to use iTunes or people that are using for instance Linux.

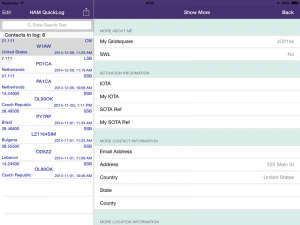
The second addition, SOTA and IOTA support, is an addition I made after people were asking for this specific functionality. As you can see in the image in the start of this post, a new section is added with Activation Information.

There are 4 fields where you can fill in the activation information for SOTA and IOTA. These fields are then used in every import and export that the user does.

Because Mircules HAM QuickLog is especially useful for activations (SOTA, IOTA, COTA, WFF etc…..) it’s essential that the supported ADIF fields for these activations are available in your logging app. And now they are! 🙂


My 1st contact with my FT817ND, by Zoran (9A6BL)

This dates back in autumn of 2012. and it involves me (Zoran), an FT-817ND and QRZ.com. Let me unfold the story:

ME

My name is Zoran and I live in city of Split, an old roman city on Croatian Adriatic coast. I’m around bands from 1977. but kinda forgot it all last decade. For years, I’ve been using an FT747GX, the rig still works OK but hey, a fresh transfusion couldn’t have harmed anyone, right? And, after a bit longer consideration and searching around local auction sites I finally decided to…but wait, this is another chapter.

FT817ND

Of course, I decided to buy above mentioned beauty from an amateur which barely used it. I remember being overexcited while waiting for my package to arrive and didn’t really know what to expect from that little radio. I could only rely to other guys experience having it for some time already…but generally, idea of portability and minimalistic gear occupied me for long time.

And so, in two days my package came (I remember it as happening right now beacuse rectifier on my moto-bike died the same day) and I unpacked it carefully…boy what a beauty I found! It was love at first sight, no question about it. I didn’t know…otherwise I would have bought it much earlier! But, set aside that faithful day and fast forward one week.

My little FT came with me to our summer residence on Adriatic coast some 70 km to south from my home QTH. We came there to do some work around and of course, first thing to do was to mount a simple inverted V dipole for 14 MHz. Two sides, each of 5m of insulated wire in lenght, feeding point at my balcony fence level, no balun, no antenna tuner (it came later that year), stretched almost horizontaly between balcony and nearest oliva trees…

I remember, it was early in the evening, my mother was watching some Turkish soap opera on TV and I stepped out on the balcony as not to disturb her. Of course, I took my FT with me, connected it to antenna and started listening. The band was actually closing for Europe, here and there States Side could be heard…and suddenly, on 14.350 MHz, at the upper end of the band, I heard a short sentence of 7S in strenght, spoken in low voice – this is RI1ANF and this is the last call. I took the mike and said in timid voice – 9A6BL/QRP….and the guy instantly replied!!!

But I forgot to mention, I had no external power supply, just an internal battery so power was way below 5W! And so, we had a short QSO, nothing much to tell, he gave me 55 which was even too much for me.

Well, working a Russian station wasn’t anything you could be excited about but I certainly was, it was the very first QRP QSO I ever made with FT817ND!

And here we came to the last chapter…

QRZ.com

A week passed, we came back to Split. I switched my PC as to see how that guy I was speaking to looks like…hmmm, let me check it at QRZ.com…and what the QRZ.com came up with?

At the time I spoke to him, Oleg was at King George Island on South Shettland! Hay, my first QSO and I made a nice DX, the one that someone else could maybe only dream about.

That’s it guys. And inspite of that notorious sentence „Life’s too short for QRP“…there’s much to be told about little Yaesu, believe me.

73 de 9A6BL

Look what I got from China; a TCXO!

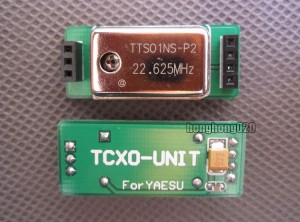
TCXO from China
Lately I have discovered online shopping in Chinese shops. Because everything is so very cheap over there, comparing to our prices in the west, it’s easy to buy more than you need!

The first thing I bought is really something I would not have bought for the regular, western, price. It’s a component for my FT-817nd radio. It will increase the value of it and can help me when I’m doing the digital modes, especially WSPR.

The component is called a TCXO (Temperature Compensated Crystal Oscillator), and is used to keep the frequency that I’m using stable.

Normally, because of the temperature, the frequency will change slightly over time when you’re transmitting. The TCXO will keep it stable. This is especially important with the digital modes because the bandwidth of a signal is very small.

So, how much did I pay?! In china they sell for 17 euro (21 USD) including Shipping.  In the western countries, the official component will set you back 88 euros (110 USD) not including shipping. So I can buy 5 Chinese TCXO’s for 1 Western TCXO!!

Now of course the Chinese component isn’t the official one that is sold by the big companies, but if it works good (which it does), why should I buy the real thing!?

For now I’m very happy with it, and also with the extra money in my wallet! 😉


This article was first published on www.pa1ca.nl and is published here with permission of the author.

My QRP setup on our trip to Montreal

Some time ago I wrote 2 small blogs. One about using a CW filter in digital mode and one about doing more with less. It was about a trip I made to Montreal, where I used my small FT-817nd radio to make some impressive contacts. Well, at least to me they were impressive! 😉

My furthest contact there was 7500 km (4660 miles) using 2.5 watt on RTTY.

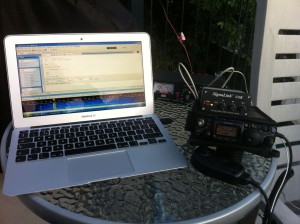
I found some pictures that I took when we were there and I decided to share them with you. I was using my FT-817nd, together with a Signalink USB device for digital mode (RTTY) and a small MFJ-904H tuner with built in 4:1 balun.

I used my Macbook Air running Windows XP on Vmware to be able to use RTTY on Digital Master 780.

As an antenna I used a 9 meter (29 feet) long end fed wire on a telescopic stick. I used the tuner with built in balun to make the wire into a usable antenna.

Why was my antenna 29 feet? I found a great article about wire lengths for end fed antennas here. It was written by VE3EED (SK), and its a must read for people that like end fed antennas, I think!

So, here are the pictures.

PA1CA my setup in Montreal

Click to view large version

PA1CA antenna setup in Montreal

Click to view large version


This article was first published on www.pa1ca.nl and is published here with permission of the author.

ft-817nd vs ft-857d

ft817 VS ft857

As people that read my blog posts might know; I’m always looking for the best portable setup. At the moment the options revolve around using the FT-817nd with a small linear or using the FT-857d.

Using an FT-817nd plus a small linear

In my post about using the FT-817nd with a “dirty amp” my idea was (and still is) to take the FT-817nd with a small linear with me when I’m out in the field. With that configuration you have a lightweight transceiver with a lightweight linear which in the end, together, is maybe not the lightest configuration.

The advantage of that configuration is that in most cases I just use the FT-817nd without getting the linear out of the bag. Only in certain cases I will really use the linear.

If you take the Tracer battery that I just bought you can still keep the weight down. The tracer battery is much lighter than the SLAB batteries that are normally used by HAM radio operators that go portable. Those SLAB batteries weigh around 3 kilos and are generally not more than 7 Ah! My Tracer is 14 Ah and weighs only 1 kilo!

Tracer 12v 14Ah Lithium Polymer Battery Pack

Tracer 12v 14Ah Lithium Polymer Battery Pack

Using the FT-857d

Another portable option, next to the one we just spoke about, is using the FT-857d. You can find enough comparisons of the ft-817nd vs ft-857d on the internet and after reading them I’m still not sure what is best.

Reasons to use the FT-857d in stead of the FT-817nd are:

  • it has 100 watts output power, the FT-817nd only has 5 watts.
  • What else ??

I cannot really think of more advantages of using the FT-857d over the FT-817. Anybody???

And now some reasons to use the FT-817nd in stead of the FT-857d:

  • the FT-817nd has a built in battery.
  • the FT-817nd ways less.
  • the FT-817nd is smaller.
  • the FT-817nd is cheaper.

So in the end it all comes down to power; the FT-857d has more of it!

If you want to use the FT-817nd with a linear you have to figure out if the whole package of FT-817nd, bigger battery and linear is maybe not the same size / weight of the FT-857d with a bigger battery. Maybe the FT-857d is actually smaller than the FT-817nd configuration including linear?

I guess in the end it depends on what you want to use the rig for. Whenever I go with the Airplane somewhere I prefer to keep the transceiver in my hand luggage and don’t mind putting the accessories (like a cheap linear) in the cargo hold. So in that case the FT-817nd is better.

If I’m going into the field carrying everything in my backpack, than maybe the FT-857d is a better option.

For me I’m still not sure what is the best option and for me the question of ft-817nd vs ft-857d is not answered yet!

If anybody has some more pro’s and con’s to add to my list please let me know. Maybe in the end it will get me closer to my perfect portable setup!


This article was first published on www.pa1ca.nl and is published here with permission of the author.

Using the FT-817nd with a “dirty amp”; the RM KL300P

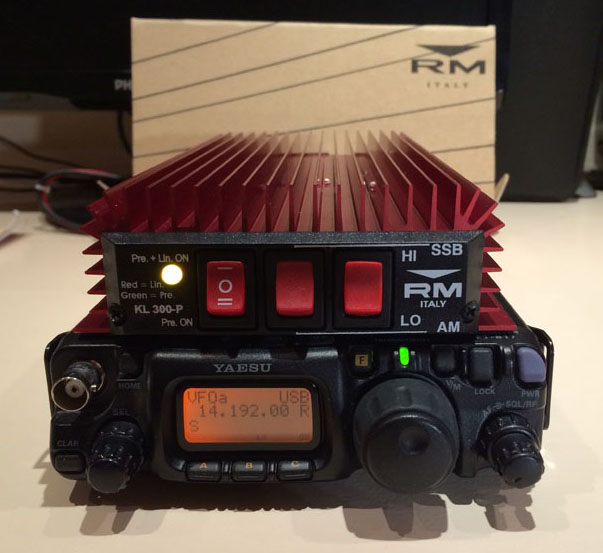
FT-817 with the RM KL300P

FT-817 with the RM K300P

Lately I’m trying to improve my portable HAM Radio setup because I want to do some activations for Castles On The Air (COTA) and WorldWide Flora & Fauna (WFF).

The idea for the activations is that you take all the HAM radio gear you need to make your contacts and carry them to the end location which can be in my case a castle or a nature park. From there you will then make your contacts.

You can imagine, if you need to carry everything to your transmitting location, you want to carry as little as possible! And so started my search for the best and lightest HAM setup possible. 🙂

My Setup

At the moment I’m using the Yaesu FT-817nd plus a manual tuner with built in 1:4 balun so I can use a random length wire antenna with that. I’m using a lot of different antenna’s by the way, depending on my mood and the circumstances.

I’m also a fan of the Hy End Fed which is an end fed antenna made by some guys here in the Netherlands. It works on the 10m, 20m and 40m band and doesn’t need any tuning. Plain, old  home brew monoband dipoles are also great in a lot of circumstances. I made a lot of them, using them in all kinds of situations.

Although I also have a Yaesu FT-857D I prefer the FT-817nd because it works also just on batteries. With that you have the lightest setup possible! Just the FT-817nd, a tuner and an antenna wire will already do the trick! 🙂 And the FT-817 is just a nice little rig, almost a toy, so I anyway like it.

For my battery power I just bought a Tracer 12 volt, 14Ah Lithium Polymer Battery Pack. Although not very cheap, it is small and light and should give me enough juice to use the FT-817nd together with the KL300P. I replaces the connection on the Tracer with some Anderson Power Poles to make connecting things to it a bit safer and easier.

Tracer 12v 14Ah Lithium Polymer Battery Pack

Tracer 12v 14Ah Lithium Polymer Battery Pack


More Power!

Because the FT-817nd has a maximum of 5 watts I was looking for some more power. When you go through all the trouble of walking to the activation location you want to be able to talk to people in the end, also if propagation isn’t so great!

I know there are some nice HAM linears available but they either are to big, to expensive or both! The Tokyo HighPower HL-45B is one of those and I do also like the RM HLA 150 linear from Italy. They both have all the band filters built in and give a pretty clean signal for this type of amplifier.

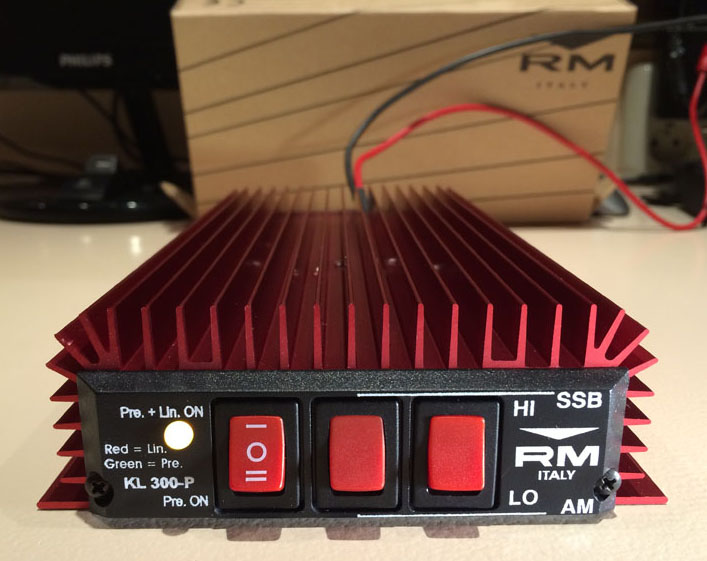
The RM KL300P Linear Amplifier

The RM KL300P Linear Amplifier

I decided in the end to go for the RM KL300P linear. It’s a small (!) HF linear with max 300w output on SSB when driven by max 10w input. The bad thing about it is that it doesn’t have any filters built in. The good thing though is the size (!) and the value for money.

RM HLA 150 with the RM KL300P

(Small) Size Matters!

The price of the KL300P is around 135 euro (185 USD) and will give you 300 watt, so it’s very affordable! The Tokyo HighPower (THP) linear in comparison costs 670 euro (925 USD) and will give you 45 watt(!)

A quick calculation shows me that the THP gives me 1 watt per 20.5 USD, the KL300P gives me 1 watt per 0.61 USD! The THP will give you bandpass filters though, that are missing in the KL300P but still, the price difference is just to much! Especially as, in my case, you are not using it very often. Next to this the THP is just to bulky to carry around with you and is in all aspects not an option for me.

I know the Italian RM linears are not allowed in the USA but in most other countries they are. In the Netherlands, where I live, you’re allowed to use any equipment if you have a HAM license as long as you keep to the rules of your license. I have a full HAREC license (comparable to the Extra license in the USA) so I’m allowed to use any and all HAM radio equipment.

Filtering

I would not use these RM linears from home without adding good filters, for sure a low pass filter to keep the neighbors happy!  My base setup is a Yaesu FT-1000mp Mark V plus an Ameritron AL-811HD linear amplifier so at home I anyway don’t need the KL300P.

As long as you don’t over drive the RM linear the disturbance to other HAM operators can be kept to a minimum, I think. The FT-817 anyway doesn’t have more than 5w which is halve of what you can use to drive the linear on SSB. And of course, when you use the RM linear close to buildings or places where people live, you should at least use a low pass filter. One that cuts off all harmonics above 30 mHz that could otherwise show up in some electronic equipment.

The low pass filter still doesn’t remove all interference but it’s a minimum addition when using the linear at home I think.

To get the same power the Tokyo High Power gives you (45w) you only need to drive the KL300P with 1 watt. In the specifications it says this is not possible on SSB but in practice it is and this will give you about 40w output.

Conclusion

I did some quick tests using the KL300P With the FT-817nd, driving it with maximum 5 watt and found that the values in the following table were reached. The amount of amperes needed is also very important to me because this shows me what battery to take.

FT-817 input KL300P output Linear Setting Amperes
5 w 200 w HI 14 A
5 w 100 w LO 8 A
2.5 w 150 w HI 10 A
2.5 w 30 w LO 4 A
1 w 40 w HI 4 A
1 w LO

One, for me not so positive point about the KL300P (next to the no filtering) is that when you turn on the linear, you also get the pre-amp “for free”. You cannot turn the pre-amp off when you’re using the linear. Especially in situations when there are some strong stations around you don’t always want a pre-amp.

Another point to think about is that the linear works with a SWR of maximum 1:1.5 (!) So you should have a good antenna and / or a good tuner to get the SWR as low as possible.

All in all, if you look at what you get for the money it’s a great little amp that makes my portable configuration perfect….. for now…. 😉


This article was first published on www.pa1ca.nl and is published here with permission of the author.

Adding a CW filter to my trusty FT-817

I decided to add a CW filter to my FT-817. Although I would hardly call it a mod, it still falls under the heading of “doing a modification” I guess, so I will describe it here.

A month or 2 ago I decided that it’s time to do another new thing in this nice Radio Amateur hobby we have. I decided to learn “the code”, a.k.a. CW, a.k.a. morse code!

I will write about my experiences in doing this some other time but suffice it to say that in CW mode you really need filters. Without a filter you can hear 5 (or more) different contacts going on at the same frequency at the same time. It’s very difficult to understand in the end who you’re talking to, especially for a person just starting out in morse code.

In the end I decided to get a 500Hz filter. This will remove more or less 80% of other signals as long as I tune (zero beat) right. The 300Hz filter would be a bit to narrow and would only work good in contest situations, not in the day to day CW contacts.

Putting the filter wasn’t much of a mod I must say. The people at Yaesu already made room for it in the transmitter and they did this pretty fool proof. You have to push the filter on top of a few pins; 3 on the left side and 4 on the right side which makes it pretty well impossible to do this wrong!

Anyway, as with my other mods I will show a few pictures of how it looks in a before and after situation.

The start; box and instructions

The start; box and instructions

The before situation. You can see at the bottom, next to the ribbon cable some open space where the filter will be placed.

The before situation. You can see at the bottom, next to the ribbon cable some open space where the filter will be placed.

A close up of the same open space where the filter will be put.

A close up of the same open space where the filter will be put.

The filter is put in. As you can see there are 3 pins on the left and 4 on the right of the filter so it's (almost) impossible to put it in the wrong way!

The filter is put in. As you can see there are 3 pins on the left and 4 on the right of the filter so it’s (almost) impossible to put it in the wrong way!

That’s it! It sounds simple, it looks simple and it was simple! 🙂


This article was first published on www.pa1ca.nl and is published here with permission of the author.